

You can combine Xero and HubSpot data in Power BI to connect sales and CRM activity with the financial results recorded in Xero. This creates a reporting view that can follow performance from opportunity and customer engagement through to invoicing, payment and outstanding debt.
Xero and HubSpot answer different parts of the reporting question. HubSpot contains information about deals, companies, contacts, owners and recorded activities. Xero contains the accounting transactions that show what was invoiced, paid or still remains due.
Bringing the two datasets together can help organisations answer questions such as:
- How does HubSpot pipeline value compare with revenue invoiced through Xero?
- Which closed-won deals have resulted in invoices?
- How much has each customer purchased and paid?
- Which HubSpot owners manage customers with overdue Xero balances?
- Which HubSpot companies cannot be matched to a Xero customer?
- Which valuable Xero customers have little recent CRM activity?
Connectorly allows compatible connections—including Xero and HubSpot connections—to be grouped so their data is available through one reporting database. This guide will start with the free Connectorly Xero All-in Power BI template, connect it to the grouped data and then add the required HubSpot tables to the same report.
Current template availability: Connectorly currently provides separate free Power BI templates for Xero and HubSpot. A combined template containing both data models and their relationships is not yet available. We are working on a combined template and plan to publish it in the future.
Until then, this guide explains how to create the combined model yourself using the existing templates as practical references. It also covers the most important part of the process: creating a dependable match between Xero customers and HubSpot companies or contacts without producing duplicated or misleading results.
For more background before you begin, see our complete guide to Xero reporting in Power BI, our complete guide to HubSpot reporting in Power BI and the Help Centre instructions explaining how to combine Connectorly data.
How the Combined Xero and HubSpot Reporting Model Works
Grouping the Xero and HubSpot connections makes both datasets available through the master Connectorly reporting database. However, grouping the connections does not automatically combine every Xero and HubSpot table inside Power BI.
The finished reporting architecture has three distinct layers:
- The Connectorly database: contains the grouped Xero and HubSpot data.
- The Power BI semantic model: contains the imported tables, measures and relationships required by the report.
- The customer-matching layer: connects the appropriate Xero customer records to their corresponding HubSpot companies or contacts.
The Xero All-in template already contains the Connectorly Xero queries, relationships, measures and report pages. After connecting that template to the grouped database, you can use Power BI Desktop’s PostgreSQL database connector to add the required HubSpot tables.
The HubSpot tables must then be incorporated into the semantic model. Their internal relationships should follow the structure demonstrated in the Connectorly HubSpot template. Finally, a controlled customer-matching method can connect the HubSpot and Xero sides of the model.
This does not mean flattening Xero and HubSpot into one large table. Financial transactions, CRM records and sales activities represent different levels of detail. Keeping them in their appropriate tables helps prevent duplicated invoice amounts, repeated deal values and misleading totals.
A simplified flow looks like this:
Xero + HubSpot → grouped Connectorly database → Xero All-in template → added HubSpot tables → customer-matching layer → combined Power BI reports
The customer-matching layer is the critical bridge. A dependable shared identifier or mapping table allows CRM filters—such as HubSpot company or owner—to reach the relevant Xero customer transactions without creating ambiguous relationships.
What You Need Before You Start
Before changing the Power BI model, make sure the Connectorly connections and report files are ready.
Connectorly connections
You will need:
- An active Connectorly for Xero and Microsoft Power BI connection
- An active Connectorly for HubSpot and Microsoft Power BI connection
- Permission to group the two connections in Connectorly
- Access to the server, database, username and password belonging to the master connection
Allow the initial data extraction to finish for both connections before grouping them. Open each connection and check its Sync History to confirm that no initial load or other extraction process is still running.
Power BI files
Download the appropriate currency version of the free Connectorly Xero All-In template. This will be the starting point for the combined report.
It is also useful to download the HubSpot All-in-one template from the Connectorly HubSpot and Power BI template collection. You will use it as a reference for HubSpot relationships, measures and report layouts rather than as the main report file.
Use a current version of Microsoft Power BI Desktop. After opening and populating the Xero template, save it as a new .pbix file before adding HubSpot data. This preserves the original template and gives you a recoverable starting point.
A planned customer-matching method
You do not need to build the customer relationship yet, but identify which matching information may be available in both systems. Possible options include:
- A dedicated customer identifier stored in both Xero and HubSpot
- A HubSpot custom property containing the corresponding Xero customer identifier
- A separately maintained customer-mapping table
- A normalised email address where the records represent the same person
- A reviewed company-name match when no stronger identifier exists
Do not assume that customer names or email addresses will match automatically. We will examine the advantages and risks of each method later in the guide.
Step 1: Group the Xero and HubSpot Connections in Connectorly
Grouping the two connections places their reporting data in the database belonging to one master connection. Power BI can then retrieve the required Xero and HubSpot tables from that database.
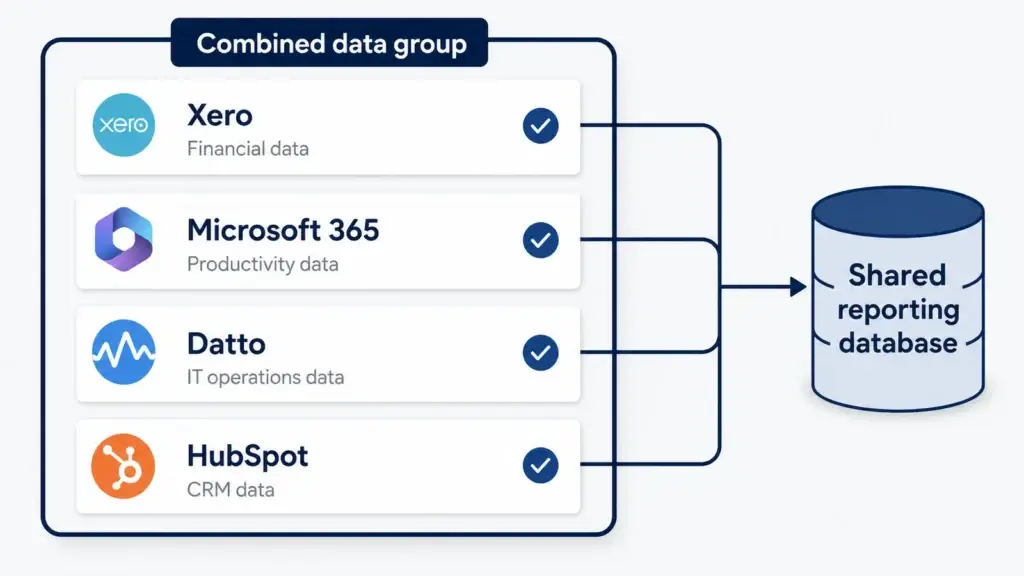
- Sign in to Connectorly and open the Connections view.
- Open each connection and check Sync History.
- Confirm that the initial data extraction has completed and that no synchronisation process is currently running.
- Return to the Connections view.
- Click and drag the HubSpot connection onto the Xero connection.
- Release it over the Xero connection so that the Xero connection becomes the master.
A border around the connections indicates that the group has been created. Connectorly then moves the HubSpot reporting data into the master connection’s database. Allow this process to finish before opening the database in Power BI.
Why use the Xero connection as the master?
In this workflow, the Xero connection is the most practical master because the combined report starts from the Xero All-In template. The master also controls important group settings. For Xero reporting, these can include shared account naming, the financial-year start and the period lock date where locked-period exports are used.
Once grouping is complete, use the connection settings belonging to the Xero master when connecting Power BI. Do not use the former standalone HubSpot database details for the combined report.
If the grouping process is still running, wait until its activity indicators have stopped before continuing. Loading the report too early may mean that the HubSpot tables are not yet available in the master database.
For screenshots and the latest Connectorly interface guidance, follow the Help Centre instructions for combining Connectorly data.
Step 2: Open the Xero All-In Template and Load the Grouped Data
After Connectorly finishes grouping the connections, open the Xero All-In template in Microsoft Power BI Desktop.
- Download the required currency version of the Xero All-In template.
- Double-click the downloaded .pbit file to open it in Power BI Desktop.
- When the template requests the database parameters, enter the Server and Database values shown in the settings of the Xero master connection.
- When Power BI requests authentication, select Database authentication.
- Enter the username and password supplied for the master connection.
- Select Connect and allow Power BI to load the Xero data.
The initial refresh may take some time, particularly when the Xero organisation contains a large accounting history or the Connectorly group contains several connections.
Check the Xero report before adding HubSpot
Once the refresh finishes, open several existing report pages and confirm that the Xero information appears correctly. For example, check:
- The organisation name
- Profit and Loss values
- Balance Sheet values
- Invoice or customer totals
- The Data current as of information
Resolve any connection or Xero reconciliation issue before adding HubSpot tables. This gives you a known working financial model and makes later troubleshooting much easier.
Save the populated template as a Power BI file
Select File → Save As and save the report as a new .pbix file. Give it a descriptive name such as:
Xero and HubSpot Combined Reporting.pbix
The Xero All-In template only loads the Xero tables and queries it was designed to use. Grouping the connections makes HubSpot data available in the same database, but it does not automatically add the HubSpot tables to this Power BI file. We will add those tables in the next step.
Step 3: Add the HubSpot Tables to the Xero Power BI Report
The grouped Connectorly database now contains HubSpot data, but the Xero template has not created queries for it. Add the required HubSpot tables through Power BI Desktop’s PostgreSQL database connector.
- In Power BI Desktop, open the Home ribbon.
- Select Get data → More.
- Search for PostgreSQL database.
- Select the connector and choose Connect.
- Enter the same Server and Database values used by the Xero master connection.
- Select Import as the data connectivity mode so it remains consistent with the imported Xero model.
- Select OK.
Power BI may reuse the database credentials already stored for the Xero queries. If it asks you to authenticate again, select Database authentication and enter the username and password belonging to the master connection.
Select the core HubSpot tables
In the Navigator window, expand the HubSpot area of the database and select the tables required for the first combined report.
Start with:
- Companies
- Contacts
- Deals
- Owners
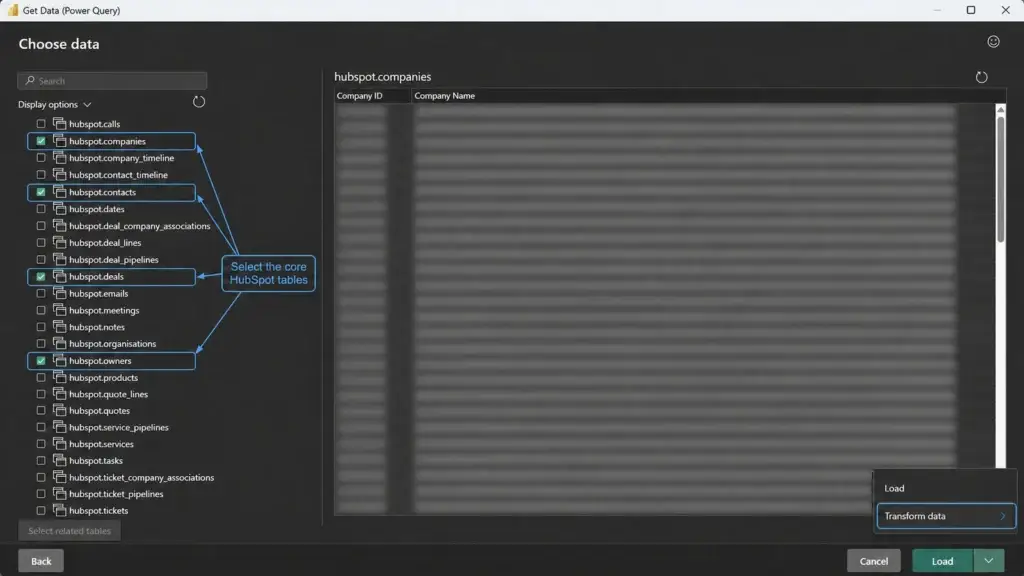
These tables provide the essential CRM information required to analyse customers, deals, ownership and financial outcomes. Additional HubSpot tables—such as Calls, Meetings, Tasks, Quotes or Tickets—can be added later when the report requires them.
Select Transform Data rather than loading the tables immediately. Power BI opens the selected tables in Power Query Editor, allowing you to inspect their structure before adding them to the model.
Check the query names and data types
In Power Query Editor, confirm that the queries use the same names as the corresponding tables in the Connectorly HubSpot template:
- hubspot companies
- hubspot contacts
- hubspot deals
- hubspot owners
If Power BI has already assigned these names, leave them unchanged. Matching the template’s query names makes it easier to recreate measures and reuse compatible visuals later.
Check that identifier fields—such as Company ID, Contact ID, Deal ID and Owner ID—have consistent data types. Also confirm that fields ending in Date use the Date data type where appropriate.
When the checks are complete, select Home → Close & Apply.
Use one date table for combined reporting
The Xero All-In template already contains a comprehensive Dates table based on the master Xero organisation’s calendar settings. For a combined finance and CRM report, this existing table can provide the shared reporting calendar.
We therefore do not need to add the separate HubSpot Dates table for the initial model. In the next step, we will connect the relevant HubSpot date fields to the existing Xero Dates table so the same reporting period can filter both CRM and financial results.
Step 4: Create the Core HubSpot Relationships
After Power BI loads the HubSpot tables, open Model view using the Model icon on the left side of Power BI Desktop. Model view shows the tables, fields and relationships inside the semantic model.
Power BI may attempt to detect relationships automatically. Review any relationships it creates before relying on them. Matching field names do not always mean that two tables should be connected.
Create the essential relationships
For the initial combined report, create these relationships:
| One side | Many side | Status | Purpose |
|---|---|---|---|
| hubspot companies[Company ID] | hubspot deals[Primary Company ID] | Active | Connects each deal to its primary HubSpot company |
| hubspot companies[Company ID] | hubspot contacts[Company ID] | Active | Connects contacts to their associated HubSpot company |
| hubspot owners[Owner ID] | hubspot deals[Owner ID] | Active | Supports deal and pipeline reporting by owner |
| Existing Xero Dates table[Date] | hubspot deals[Created Date] | Active | Analyses deals by the date they entered HubSpot |
| Existing Xero Dates table[Date] | hubspot deals[Closed Won Date] | Inactive | Supports closed-won measures by their actual won date |
| Existing Xero Dates table[Date] | hubspot deals[Forecast Close Date] | Inactive | Supports forward-looking pipeline and forecast measures |
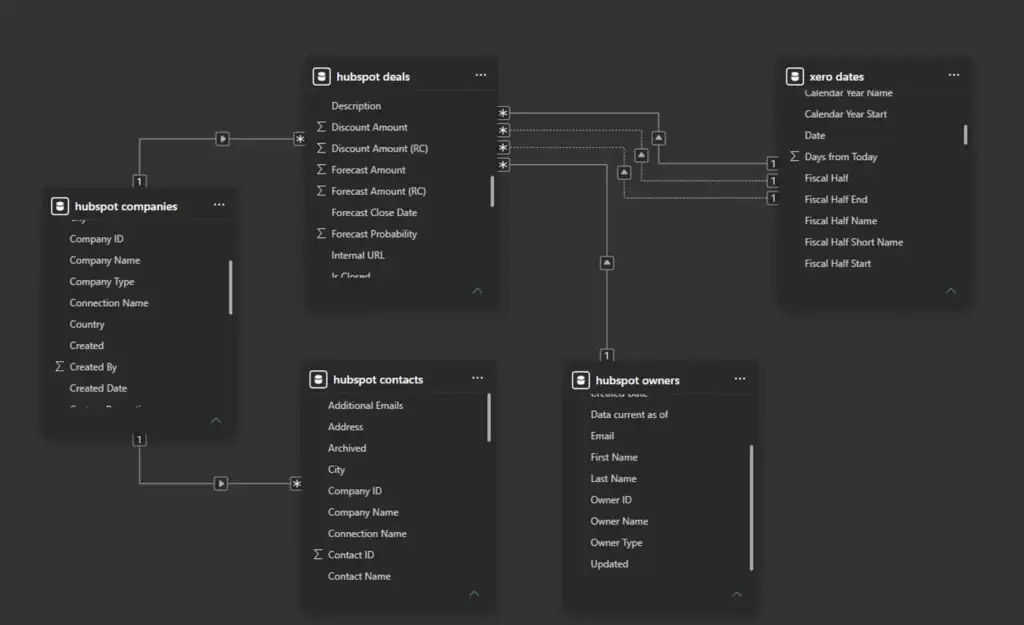
For each relationship:
- Use One-to-many (1:*) cardinality.
- Keep the dimension table—Companies, Owners or Dates—on the one side.
- Use Single cross-filter direction from the dimension to the related HubSpot table.
- Only select Make this relationship active for the relationships marked Active above.
You can create a relationship by dragging the key field from one table onto the corresponding field in the other table. Double-click the resulting relationship line to review its cardinality, filter direction and active status.
Why are some date relationships inactive?
A HubSpot deal contains several dates, and each one answers a different reporting question. Power BI permits only one active relationship between the same two tables at a time.
The active relationship to Created Date supports general deal-creation trends. Measures analysing closed-won performance or forecast timing can activate the relevant inactive relationship using the DAX USERELATIONSHIP function.
Avoid ambiguous relationship paths
Do not activate every possible relationship simply because matching identifiers are available. For example, adding active relationships from Owners to Companies, Owners to Deals and Companies to Deals can create more than one filter path between Owners and Deals.
Begin with the relationships required for the report and add others only when a defined calculation needs them. We will create the relationship between HubSpot customers and Xero customers separately because it requires a controlled matching method rather than automatic relationship detection.
Step 5: Use the HubSpot Template as a Reference
Connectorly currently provides separate Power BI templates for Xero and HubSpot. The HubSpot All-in-one template can therefore act as a useful reference while you extend the Xero All-In report with HubSpot data.
At present, Connectorly does not provide a free template containing the complete Xero and HubSpot table and relationship models together. We are working on a combined template that we plan to publish in the future.
Open both templates in Power BI Desktop
- Leave your combined Xero and HubSpot report open.
- Download and open the Connectorly HubSpot All-in-one template in a second Power BI Desktop window.
- Load the HubSpot template using the same grouped Connectorly database if you want to inspect the working visuals and values.
- Open Model view in the HubSpot template to examine its relationships, measures and table structure.
Power BI does not provide a standard command that copies relationships from one report to another. Use the HubSpot template as a reference and recreate only the relationships and measures required by your combined report.
Recreate the measures required by a visual
Before copying a HubSpot visual, check which measures it uses. If a required measure is missing from the combined report:
- Select the measure in the HubSpot template.
- Copy its DAX expression from the formula bar.
- Return to the combined report and select New measure.
- Recreate the measure using the same name and DAX expression.
- Confirm that every referenced table and column exists under the same name in the destination model.
Copy compatible visuals into the combined report
Power BI Desktop allows visuals to be copied between two reports:
- Create a blank report page in the combined Xero and HubSpot report.
- In the HubSpot template, select the visual you want to reuse.
- Press Ctrl+C.
- Move to the combined report and press Ctrl+V.
- Repeat this process for the other visuals you need.
You can also select all the visuals on a report page and copy them together. However, the destination model must contain the tables, columns and measures used by those visuals. If something is missing or named differently, Power BI displays an error identifying the unresolved fields.
After copying the visuals, review their filters, slicers, interactions, drill-through settings and formatting. The visual formatting is generally preserved, while theme-based elements may adopt the theme of the destination report.
This approach lets you reuse parts of the Connectorly HubSpot reporting experience while keeping the Xero All-In template as the foundation of the combined report.
Step 6: Decide How to Match HubSpot Customers to Xero Contacts
Before Xero and HubSpot values can appear together in a meaningful Power BI report, the model needs a reliable way to recognise the same customer in both systems.
HubSpot normally represents an organisation in hubspot companies, while Xero represents the customer or supplier in xero contacts. These records are created independently, so their identifiers are not automatically related.
For example, hubspot companies[Company ID] and xero contacts[Contact ID] are identifiers from different systems. They must not be joined directly simply because both identify a customer record.
Recommended matching methods
Use the most reliable matching method available in your organisation:
- A shared customer identifier: This is the preferred option. Store the same internal customer reference in HubSpot and Xero, potentially using a HubSpot custom company property. The value should remain stable even if the company name, email address or other contact details change.
- A maintained customer mapping table: Create a small table that records which HubSpot Company ID belongs to which Xero Contact ID. This provides explicit control and is particularly useful when the two systems do not share a suitable identifier.
- Email address: Compare hubspot contacts[Email] with xero contacts[Email Address]. Convert both values to lowercase and remove leading or trailing spaces before matching them. Email matching is useful as a starting point, but it may not be reliable when a company has several contacts or uses different finance and sales email addresses.
- Company or contact name: Compare hubspot companies[Company Name] with xero contacts[Contact Name] only as a final fallback. Differences in punctuation, abbreviations, legal suffixes and spelling can create incorrect or missing matches.
Account for multiple Xero organisations
If the grouped Connectorly database contains more than one Xero organisation, include xero contacts[Connection Name] in the mapping alongside xero contacts[Contact ID]. The same real-world customer may have a separate Xero contact record in each legal entity.
A useful mapping structure is:
| Customer Key | HubSpot Company ID | Xero Connection Name | Xero Contact ID |
|---|---|---|---|
| CUST-001 | Example HubSpot company ID | Example Xero organisation | Example Xero contact ID |
Customer Key is an internal identifier representing the real-world customer across both systems. It allows one HubSpot company to be associated with separate Xero contact records from multiple legal entities.
Do not create a direct many-to-many relationship between hubspot companies and xero contacts based on company names or email addresses. Duplicate or incomplete values can produce ambiguous filtering and overstated financial results.
In the next step, we will create this customer mapping layer in Power BI and connect it to the relevant HubSpot and Xero tables.
Step 7: Automatically Match HubSpot Companies to Xero Contacts
Instead of manually mapping every customer, Power Query can automatically identify records whose company names match. We will use a conservative matching process that accepts only unique, exact matches after differences in capitalisation, spacing and punctuation have been removed.
This first automatic pass deliberately avoids fuzzy matching. Records that are missing or ambiguous will be handled using email addresses and a small manual exceptions table in the next step.
Create a stable Customer Key for HubSpot companies
- In Power BI Desktop, select Transform data to open Power Query Editor.
- Select the hubspot companies query.
- Open the Add Column tab and select Custom Column.
- Name the new column Customer Key.
- Enter the following formula:
if [Company ID] = null then null
else Text.From([Connection Name]) & "|" & Text.From([Company ID])Select OK and set the new Customer Key column to the Text data type.
Including Connection Name makes the key safe for grouped databases that contain more than one HubSpot organisation.
Create a reusable company-name normalisation function
- In Power Query Editor, select Home > New Source > Blank Query.
- Rename the new query fxNormaliseName.
- Right-click the
fxNormaliseNamequery and select Advanced Editor. - Remove the existing content and paste the following function:
(value as nullable text) as nullable text =>
let
Cleaned =
if value = null
then null
else Text.Lower(Text.Trim(Text.Clean(value))),
AmpersandExpanded =
if Cleaned = null
then null
else Text.Replace(Cleaned, "&", "and"),
AllowedCharacters =
List.Combine({{"a".."z"}, {"0".."9"}}),
Normalised =
if AmpersandExpanded = null
then null
else Text.Select(AmpersandExpanded, AllowedCharacters)
in
if Normalised = ""
then null
else NormalisedSelect Done. Power Query should display the query as a function with an Invoke button.
The function converts names to lowercase, removes leading and trailing spaces, replaces an ampersand with the word “and”, and removes spaces and punctuation.
For example:
- Example & Partners becomes exampleandpartners.
- EXAMPLE AND PARTNERS also becomes exampleandpartners.
Prepare the HubSpot company candidates
- Right-click hubspot companies and select Reference.
- Rename the new query HubSpot Name Candidates.
- Keep these columns:
- Customer Key
- Connection Name
- Company ID
- Company Name
- Open Add Column > Invoke Custom Function.
- Name the new column Normalised Name.
- Select fxNormaliseName as the function.
- For the value parameter, select Company Name.
- Select OK.
- Filter Normalised Name to remove null and blank values.
Exclude duplicate HubSpot company names
A normalised company name should be accepted automatically only when it identifies one HubSpot company.
- With HubSpot Name Candidates selected, open Home > Group By.
- Select Advanced.
- Group by Normalised Name.
- Create an aggregation named Rows using the All Rows operation.
- Add another aggregation named Match Count using the Count Rows operation.
- Select OK.
- Filter Match Count so that only rows equal to 1 remain.
- Expand the Rows column.
- Select:
- Customer Key
- Connection Name
- Company ID
- Company Name
- Clear Use original column name as prefix and select OK.
Do not expand Normalised Name from the nested table because it already exists as the grouping column.
Prepare the Xero contact candidates
- Right-click xero contacts and select Reference.
- Rename the new query Xero Name Candidates.
- Keep these columns:
- Connection Name
- Contact ID
- Contact Name
- Open Add Column > Invoke Custom Function.
- Name the new column Normalised Name.
- Select fxNormaliseName.
- For the value parameter, select Contact Name.
- Select OK.
- Filter Normalised Name to remove null and blank values.
Exclude duplicate Xero contact names
The same contact name may legitimately appear in different Xero organisations. We therefore test uniqueness within each Xero connection rather than across the entire grouped database.
- With Xero Name Candidates selected, open Home > Group By.
- Select Advanced.
- Group by Connection Name.
- Select Add grouping and add Normalised Name.
- Create an aggregation named Rows using All Rows.
- Add another aggregation named Match Count using Count Rows.
- Select OK.
- Filter Match Count so that only rows equal to 1 remain.
- Expand Rows and select:
- Contact ID
- Contact Name
- Clear Use original column name as prefix and select OK.
Create the automatic name matches
- Select Home > Merge Queries > Merge Queries as New.
- Use Xero Name Candidates as the first table.
- Use HubSpot Name Candidates as the second table.
- Select Normalised Name in both tables.
- Choose Inner as the join kind.
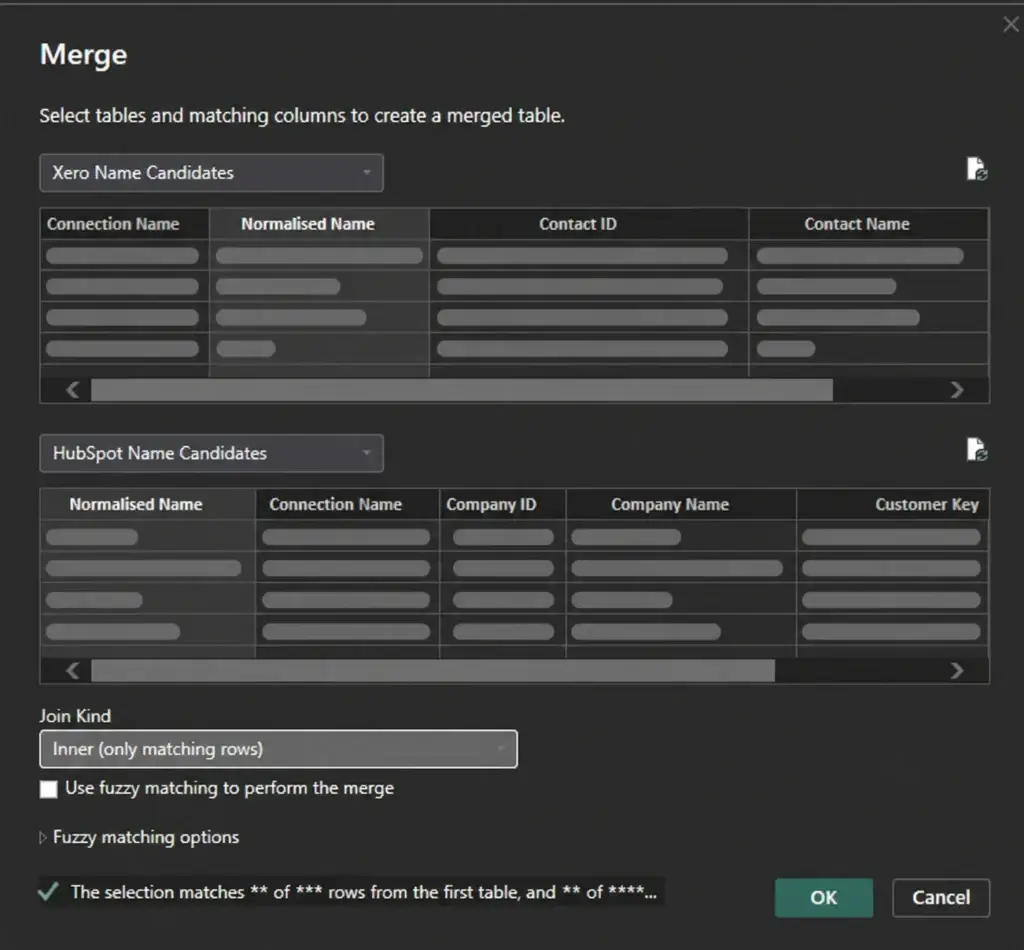
Power Query can automatically match unique Xero contacts and HubSpot companies using their normalised names. - Select OK.
- Rename the new query Automatic Name Matches.
- Rename its existing Connection Name column to Xero Connection Name.
- Expand the merged HubSpot column and select:
- Customer Key
- Connection Name
- Company ID
- Company Name
- Clear Use original column name as prefix and select OK.
- Rename the expanded fields:
- Connection Name to HubSpot Connection Name
- Company ID to HubSpot Company ID
- Company Name to HubSpot Company Name
- Contact ID to Xero Contact ID
- Contact Name to Xero Contact Name
- Open Add Column > Custom Column.
- Name the column Match Method and enter:
"Exact normalised name"Review the automatic results
Before using these matches in the model, inspect the following columns in Automatic Name Matches:
- HubSpot Company Name
- Xero Contact Name
- HubSpot Company ID
- Xero Connection Name
- Xero Contact ID
- Customer Key
- Match Method
The query contains only names that are unique on the relevant side of the comparison. However, you should still review the results before treating them as confirmed customer matches.
Do not merge Automatic Name Matches into xero contacts yet. In the next step, we will add exact email matches, identify unmatched and conflicting records, and create a small manual overrides table that takes priority over the automatic results.
Step 8: Add Automatic Email Matches
Exact name matching will not find every customer. HubSpot and Xero may contain different company names, abbreviations or legal suffixes. An exact email match provides a useful second method.
This process matches hubspot contacts[Email] with xero contacts[Email Address]. The HubSpot contact’s Company ID then identifies the corresponding HubSpot company and Customer Key.
Individual customers: This example matches Xero contacts to HubSpot companies, which is suitable when the customer is an organisation. However, a Xero contact may represent an individual—for example, when an invoice is raised to a person rather than their company. In these cases, repeat the same name and email matching approach using hubspot contacts[Contact Name], hubspot contacts[Email] and hubspot contacts[Contact ID]. A contact-level Customer Key can be created using the HubSpot Connection Name, the word CONTACT and the Contact ID. Do not force an individual customer to a HubSpot company when no appropriate company association exists.Â
Create an email normalisation function
- In Power Query Editor, select Home > New Source > Blank Query.
- Rename the new query fxNormaliseEmail.
- Right-click fxNormaliseEmail and select Advanced Editor.
- Remove the existing content and paste:
(value as nullable text) as nullable text =>
let
Cleaned =
if value = null
then null
else Text.Lower(Text.Trim(Text.Clean(value)))
in
if Cleaned = ""
then null
else CleanedSelect Done. The function converts email addresses to lowercase and removes unnecessary spaces and non-printing characters. It does not remove characters such as @, full stops or hyphens.
Prepare the HubSpot email candidates
- Right-click hubspot contacts and select Reference.
- Rename the new query HubSpot Email Candidates.
- Keep these columns:
- Connection Name
- Company ID
- Filter Company ID to remove null values.
- Open Add Column > Custom Column.
- Name the new column Customer Key and enter:
if [Company ID] = null then null
else Text.From([Connection Name]) & "|" & Text.From([Company ID])- Set Customer Key to the Text data type.
- Open Add Column > Invoke Custom Function.
- Name the new column Normalised Email.
- Select fxNormaliseEmail as the function.
- For the value parameter, select Email.
- Select OK.
- Set Normalised Email to the Text data type.
- Filter Normalised Email to remove null and blank values.
Allow duplicate contacts belonging to the same company
The same email address may appear on duplicate HubSpot contact records that belong to the same company. This does not make the customer match ambiguous.
- Select Normalised Email.
- Hold Ctrl and select Customer Key.
- Open Home > Remove Rows > Remove Duplicates.
This leaves one row for each unique combination of email address and HubSpot customer.
Exclude emails belonging to several HubSpot companies
- Open Home > Group By.
- Select Advanced.
- Group by Normalised Email.
- Create an aggregation named Rows using All Rows.
- Add an aggregation named Match Count using Count Rows.
- Select OK.
- Filter Match Count so only rows equal to 1 remain.
- Expand Rows and select:
- Connection Name
- Company ID
- Customer Key
- Clear Use original column name as prefix and select OK.
This prevents a shared email address from automatically linking one Xero contact to several HubSpot companies.
Prepare the Xero email candidates
- Right-click xero contacts and select Reference.
- Rename the query Xero Email Candidates.
- Keep these columns:
- Connection Name
- Contact ID
- Contact Name
- Email Address
- Open Add Column > Invoke Custom Function.
- Name the new column Normalised Email.
- Select fxNormaliseEmail.
- For the value parameter, select Email Address.
- Select OK.
- Set Normalised Email to the Text data type.
- Filter Normalised Email to remove null and blank values.
Exclude duplicated emails within each Xero organisation
- Open Home > Group By.
- Select Advanced.
- Group by Connection Name.
- Select Add grouping and add Normalised Email.
- Create an aggregation named Rows using All Rows.
- Add an aggregation named Match Count using Count Rows.
- Select OK.
- Filter Match Count so only rows equal to 1 remain.
- Expand Rows and select:
- Contact ID
- Contact Name
- Email Address
- Clear Use original column name as prefix and select OK.
Create the exact email matches
- Select Home > Merge Queries > Merge Queries as New.
- Use Xero Email Candidates as the first table.
- Use HubSpot Email Candidates as the second table.
- Select Normalised Email in both tables.
- Choose Inner as the join kind.
- Make sure Use fuzzy matching to perform the merge is not selected.
- Select OK.
- Rename the new query Automatic Email Matches.
- Rename its existing Connection Name column to Xero Connection Name.
- Expand the merged HubSpot column and select:
- Connection Name
- Company ID
- Customer Key
- Clear Use original column name as prefix and select OK.
- Rename the expanded columns:
- Connection Name to HubSpot Connection Name
- Company ID to HubSpot Company ID
- Contact ID to Xero Contact ID
- Contact Name to Xero Contact Name
Add the HubSpot company name for validation
- With Automatic Email Matches selected, open Home > Merge Queries.
- Use hubspot companies as the second table.
- Select Customer Key in both tables.
- Choose Left outer as the join kind and select OK.
- Expand the merged column and select only Company Name.
- Clear Use original column name as prefix and select OK.
- Rename Company Name to HubSpot Company Name.
- Add a custom column named Match Method containing:
"Exact email"Review the email matches
Compare Xero Contact Name with HubSpot Company Name. An exact email match is a strong signal, but it should still be reviewed when a generic address, external accountant or shared mailbox could be associated with more than one organisation.
Once the matches have been reviewed, remove Email Address and Normalised Email from Automatic Email Matches. They are no longer required by the mapping output and may contain personal data.
Set the final data types as follows:
| Column | Data type |
|---|---|
| Customer Key | Text |
| Xero Contact ID | Text |
| HubSpot Company ID | Whole number |
| Match Method | Text |
Do not append the email and name matches yet. In the next step, we will give email matches priority, identify the remaining unmatched records and add a small manual overrides table for genuine exceptions.
Step 9: Consolidate Matches and Review Exceptions
You should now have two sets of automatic matches:
- Automatic Email Matches – customers matched using an exact email address
- Automatic Name Matches – customers matched using an exact normalised name
Before creating the final customer mapping, combine these results carefully. Email matches should take priority because an exact email address is generally more specific than a normalised name. However, disagreements between the two methods should be reviewed rather than silently accepted.
Standardise the Two Match Queries
Both queries must contain the same core columns before they can be combined.
- Right-click Automatic Email Matches and select Reference.
- Rename the new query Email Matches for Append.
- Keep these columns:
- Customer Key
- Xero Connection Name
- Xero Contact ID
- Xero Contact Name
- HubSpot Connection Name
- HubSpot Company ID
- HubSpot Company Name
- Match Method
- Repeat the process for Automatic Name Matches.
- Rename that referenced query Name Matches for Append and keep the same columns.
Check that corresponding identifier columns use the same data types in both queries. In particular, Xero Contact ID and Customer Key should be Text, while HubSpot Company ID should normally be Whole number.
Identify Conflicting Automatic Matches
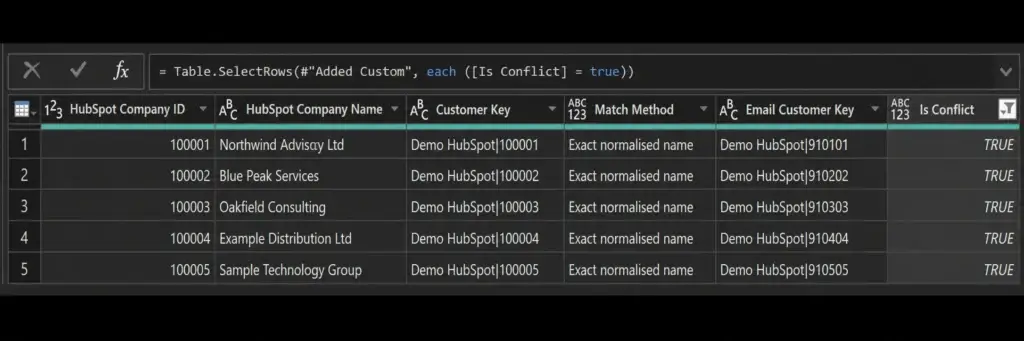
A conflict occurs when email matching and name matching assign the same Xero contact to different HubSpot companies.
- Right-click Name Matches for Append and select Reference.
- Rename the query Conflicting Automatic Matches.
- Select Home → Merge Queries.
- Select Email Matches for Append as the second query.
- In the first table, select Xero Connection Name. Hold Ctrl and then select Xero Contact ID.
- Select the same two columns in the same order in the second table.
- Choose Inner (only matching rows) as the join kind.
- Select OK.
- Expand only Customer Key from the email-match query and rename it Email Customer Key.
- Select Add Column → Custom Column.
- Name the column Is Conflict and enter:
[Customer Key] <> [Email Customer Key]- Filter Is Conflict to retain only true.
If the resulting query contains no rows, the two methods do not disagree. If it contains records, inspect them and decide which HubSpot company is correct. Do not allow the name-based match to overwrite a more reliable email match without review.
Give Email Matches Priority
Next, remove name matches for Xero contacts that already have an email match.
- Right-click Name Matches for Append and select Reference.
- Rename the query Name Matches Without Email.
- Select Home → Merge Queries.
- Select Email Matches for Append as the second query.
- In each table, select Xero Connection Name followed by Xero Contact ID, holding Ctrl when selecting the second column.
- Choose Left anti (rows only in first) as the join kind.
- Select OK.
The result contains only name matches for Xero contacts that do not already have an email match.
Create the Consolidated Automatic Mapping
- Select Home → Append Queries → Append Queries as New.
- Select Two tables.
- Choose:
- Email Matches for Append
- Name Matches Without Email
- Select OK.
- Rename the new query Automatic Customer Matches.
Power Query appends fields according to their column names, so confirm that the two source queries use identical names. The consolidated query now uses exact email matches first and exact normalised-name matches only where no email match exists.
Create an Unmatched Customer Review List
The remaining Xero contacts should be reviewed rather than discarded.
- Right-click xero contacts and select Reference.
- Rename the new query Unmatched Xero Contacts.
- Keep:
- Connection Name
- Contact ID
- Contact Name
- Email Address
- Select Home → Merge Queries.
- Select Automatic Customer Matches as the second query.
- In the Xero table, select Connection Name followed by Contact ID.
- In the automatic mapping, select Xero Connection Name followed by Xero Contact ID.
- Choose Left anti (rows only in first).
- Select OK.
This query now lists Xero contacts that were not matched automatically. Review it for abbreviated names, trading names, shared email addresses, spelling differences and customers that exist in only one system.
Some Xero contacts may represent individuals rather than companies. In those cases, compare the Xero contact with hubspot contacts[Contact Name], hubspot contacts[Email] and hubspot contacts[Contact ID]. Do not force an individual customer onto an unrelated HubSpot company.
Add Manual Overrides Where Necessary
If you identify exceptions, use Home → Enter Data to create a table named Manual Customer Overrides with these columns:
- Customer Key
- Xero Connection Name
- Xero Contact ID
- Match Method
Enter Manual override in the Match Method column. For a HubSpot company, use its existing company-level Customer Key. For an individual matched to a HubSpot contact, use a contact-level key in this format:
Connection Name|CONTACT|Contact IDManual overrides should take priority over automatic matches. Remove overridden Xero contacts from the automatic mapping with a Left anti merge, then append the remaining automatic matches to the manual override table.
If you do not currently have any exceptions, you can skip the manual override table and use Automatic Customer Matches as the current mapping. Add manual overrides later when the review process identifies a genuine exception.
Privacy note: These review queries may contain customer names, email addresses and system identifiers. Anonymise this information before using screenshots in documentation, blog articles or support material.
Step 10: Connect Xero Contacts to HubSpot Companies
The consolidated customer mapping can now act as a bridge between xero contacts and hubspot companies. This lets a HubSpot company filter the corresponding Xero customer activity without directly joining the two source tables.
Do not create a direct many-to-many relationship between Xero contacts and HubSpot companies. The mapping table should store the approved combinations of their unique keys.
Create a Unique Xero Contact Key
Although Xero Contact ID values are normally unique, including the connection name makes the key safe when the report contains multiple Xero organisations.
- Open Transform data.
- Select the xero contacts query.
- Confirm that Contact ID uses the Text data type.
- Select Add Column → Custom Column.
- Name the column Xero Contact Key.
- Enter:
[Connection Name] & "|" & [Contact ID]- Select OK.
- Set Xero Contact Key to the Text data type.
Prepare the Customer Mapping Query
If you have not created manual overrides, right-click Automatic Customer Matches, select Reference and rename the new query Customer Mapping.
If you created manual overrides, use the final query containing the manual overrides and the remaining automatic matches, and name that query Customer Mapping.
- Select Customer Mapping.
- Confirm that these columns are available:
- Customer Key
- Xero Connection Name
- Xero Contact ID
- Match Method
- Confirm that Customer Key and Xero Contact ID use the Text data type.
- Select Add Column → Custom Column.
- Name the new column Xero Contact Key.
- Enter:
[Xero Connection Name] & "|" & [Xero Contact ID]- Select OK.
- Set Xero Contact Key to the Text data type.
- Select Customer Key and then, while holding Ctrl, select Xero Contact Key.
- Select Home → Remove Rows → Remove Duplicates.
The mapping may contain the same HubSpot company more than once when several Xero contacts belong to that company. That is valid. However, the same Customer Key and Xero Contact Key combination should not appear more than once.
Confirm the HubSpot Customer Key
The hubspot companies query should already contain the Customer Key created earlier:
[Connection Name] & "|" & Text.From([Company ID])Confirm that hubspot companies[Customer Key] uses the Text data type and contains one unique value for each HubSpot company.
Load the Mapping into the Model
- Right-click Customer Mapping.
- Make sure Enable load is selected.
- Select Home → Close & Apply.
- Wait for Power BI to finish applying the changes.
Create the HubSpot Relationship
- Open Model view.
- Select Modeling → Manage relationships → New.
- Create the following relationship:
- hubspot companies[Customer Key]
- Customer Mapping[Customer Key]
- Set Cardinality to One to many (1:*), with hubspot companies on the one side.
- Set Cross-filter direction to Single.
- Make sure Make this relationship active is selected.
- Select OK.
Create the Xero Relationship
- Select New again.
- Create the following relationship:
- xero contacts[Xero Contact Key]
- Customer Mapping[Xero Contact Key]
- Set Cardinality to One to many (1:*), with xero contacts on the one side.
- Set Cross-filter direction to Both.
- Make sure Make this relationship active is selected.
- Select OK.
This filter arrangement allows a HubSpot company to filter the Customer Mapping table, which can then filter the corresponding Xero contact and its related financial activity.
Only the Xero contact relationship is configured for bidirectional filtering. Avoid changing every relationship to Both, as multiple bidirectional paths can create ambiguous filtering and make the model harder to understand.
Check the Relationship Layout
The relevant section of the model should now follow this pattern:
hubspot companies
1
|
*
Customer Mapping
*
|
1
xero contactsThe mapping table is on the many side of both relationships. Power BI should not create a direct relationship between xero contacts and hubspot companies.
Test the Combined Filtering
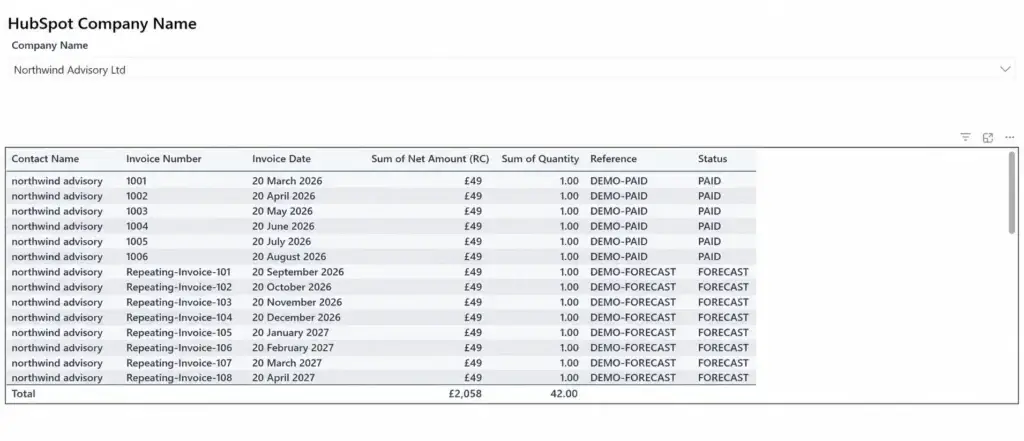
- Create a temporary report page.
- Add hubspot companies[Company Name] to a slicer.
- Add a simple Xero sales, invoice or revenue measure from the existing Xero model to a card or table.
- Select a HubSpot company that has an approved customer mapping.
- Confirm that the Xero result changes to show the associated customer activity.
- Select a HubSpot company with no mapping and confirm that it does not incorrectly return another customer’s Xero activity.
If the Xero result does not change, check the relationship direction, verify that both key columns use Text, and confirm that the Customer Mapping table contains the selected company’s Customer Key.
Once testing is complete, hide technical fields such as Customer Key and Xero Contact Key from the report view. You can also hide the Customer Mapping table if report creators do not need to use it directly.
Step 11: Build Your First Combined Report Page
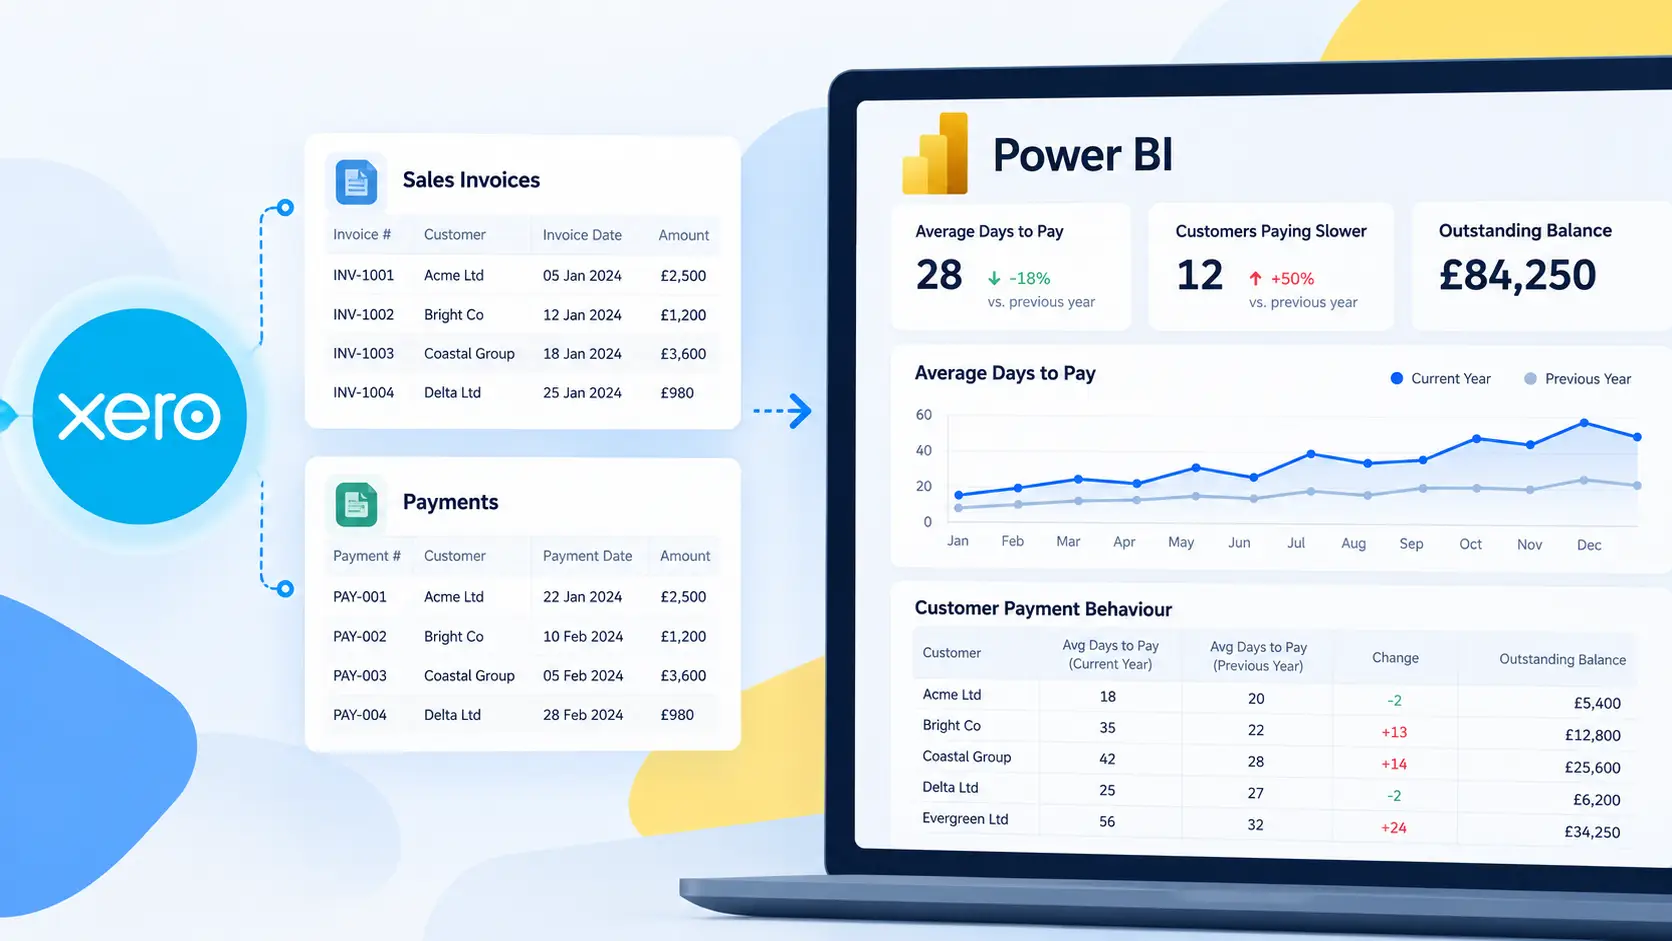
With the Customer Mapping table working, you can build a report page that presents HubSpot sales information and Xero financial results together.
The safest design is to use the shared HubSpot company selection to filter separate HubSpot and Xero visuals. Avoid placing raw deal and invoice records in the same table visual. A deal and an invoice represent different levels of detail, so combining their rows directly can duplicate values and produce misleading totals.
Start with an Existing Xero Report Page
- Find a suitable customer, sales or invoice page in the Connectorly Xero All-In template.
- Right-click the page tab and select Duplicate page.
- Rename the duplicated page HubSpot and Xero Customer View.
- Remove any visuals that are not needed, while keeping the existing Xero measures and invoice visuals.
This approach preserves the measures, formatting and report interactions already available in the Xero template.
Add the Shared Company Filter
- Add a new slicer to the page.
- Add hubspot companies[Company Name] to the slicer.
- Change the slicer to a dropdown if you want to conserve space.
- Select a company that exists in the Customer Mapping table.
- Confirm that the existing Xero visuals respond to the selection.
This slicer becomes the shared customer selection for the combined page. It filters HubSpot records directly and reaches the corresponding Xero activity through the Customer Mapping table.
Add a HubSpot Deals Table
Create a separate table visual for the selected company’s HubSpot opportunities. Useful fields from hubspot deals include:
- Deal Name
- Pipeline Label
- Pipeline Stage Label
- Owner Name
- Amount (RC)
- Forecast Amount (RC)
- Forecast Close Date
- Closed Won Date
Only include the fields that are relevant to the intended audience. For example, an account manager may need the owner, stage and next expected close date, while a finance user may focus on deal value and expected revenue.
Keep Xero Invoice Activity in a Separate Visual
Use the existing Xero invoice visual from the template or create a separate table containing fields such as:
- Contact Name
- Invoice Number
- Invoice Date
- Due Date
- Net Amount (RC)
- Amount Due (RC)
- Status
The HubSpot company slicer should filter this visual to the mapped Xero contact. This lets users compare sales opportunities with actual invoices without joining individual deal rows directly to individual invoice rows.
Add Summary Cards
Depending on the measures available in your templates, useful summary cards can include:
- Open pipeline value
- Forecast pipeline value
- Closed-won value
- Xero invoiced revenue
- Outstanding receivables
- Last invoice date
Use HubSpot measures for pipeline and deal values, and the existing Connectorly Xero measures for financial values. This preserves the calculation logic already provided in each template.
Check Visual Interactions
- Select the HubSpot company slicer.
- Open Format → Edit interactions.
- Confirm that it filters both the HubSpot and Xero visuals.
- Select several mapped companies and check the results.
- Select a company without a mapping and confirm that unrelated Xero information does not appear.
- Clear the slicer and confirm that the report returns to its expected overall view.
Useful Combined Reporting Questions
The combined page can help users answer questions that neither system can answer on its own:
- Which HubSpot customers generate the most invoiced revenue in Xero?
- Which companies have a strong sales pipeline but little historical revenue?
- Have closed-won deals resulted in invoices?
- Which valuable customers also have overdue balances?
- How does forecast pipeline compare with existing customer revenue?
- Which account owners manage the highest-value financial relationships?
The mapping does not imply that an individual HubSpot deal created a particular Xero invoice. Establishing that transaction-level connection normally requires a shared deal, order, quote or project identifier. Without such an identifier, present deal and invoice information as related customer-level activity rather than claiming a direct one-to-one match.
Step 12: Maintain the Customer Mapping
The automatic matching queries run again whenever the Power BI model refreshes. This allows new customers to be matched without rebuilding the process manually. However, automatic results and exceptions should still be reviewed regularly.
Review the Exception Queries
Use the following queries as data-quality checks:
- Conflicting Automatic Matches – records where email and name matching identify different HubSpot companies
- Unmatched Xero Contacts – Xero contacts that do not currently have an approved HubSpot mapping
After each significant refresh, check whether these queries contain new records. A conflict should never be resolved automatically without verifying the correct customer.
Update Manual Overrides
Add a manual override when:
- Xero and HubSpot use substantially different customer names
- several customers share a generic email address
- a trading name differs from the registered company name
- a Xero contact represents an individual rather than a company
- the automatic name and email methods disagree
- multiple HubSpot records could represent the same Xero customer
When an override is no longer valid, update or remove it. For example, a company may be merged, renamed or archived in HubSpot.
Do Not Edit Automatic Results Directly
Changes made directly inside an automatically generated query will not provide a reliable exception process and may be lost when its transformation steps change.
Store confirmed exceptions in Manual Customer Overrides. This keeps automated logic separate from business decisions and makes the mapping easier to audit.
Add a Mapping Quality Summary
You can create a small internal report page for monitoring the mapping. Useful indicators include:
- total Xero contacts
- automatically matched contacts
- email matches
- normalised-name matches
- manual overrides
- unmatched contacts
- conflicting automatic matches
This page does not need to be visible to ordinary report users. It can serve as an administrative check before publishing or refreshing important management reports.
Check for Duplicate Keys
Before relying on the mapping, confirm that:
- hubspot companies[Customer Key] contains one unique row per HubSpot company
- xero contacts[Xero Contact Key] contains one unique row per Xero contact
- the same Customer Key and Xero Contact Key combination does not appear more than once in Customer Mapping
- a Xero contact is not assigned to multiple HubSpot companies unless this is an intentional and reviewed business rule
Unexpected duplicates can produce ambiguous relationships or repeated financial values.
Test After Structural Changes
Repeat the filtering test whenever you:
- add another Xero organisation
- change a Connectorly connection name
- merge or archive HubSpot companies
- change the mapping logic
- add contact-level mappings
- modify model relationships
Select several known HubSpot companies and confirm that each one filters only its corresponding Xero activity.
Refresh Considerations
The Xero and HubSpot tables are available from the same Connectorly PostgreSQL database, so they can refresh as part of the same Power BI semantic model. The Power Query transformations and mapping logic then run during the model refresh.
Refresh duration will depend on the number of source rows and the complexity of the transformations. Keep helper queries such as candidate lists and exception checks as streamlined as possible. Disable load for intermediate queries that do not need to appear in the semantic model.
Connectorly currently provides separate Xero and HubSpot templates. It does not yet provide a free template containing both complete models and their cross-system customer relationships. Connectorly is working on a combined template that we plan to publish in the future.
Troubleshooting Common Problems
The HubSpot Slicer Does Not Filter Xero Data
Check the complete filter path:
hubspot companies
→ Customer Mapping
→ xero contacts
→ Xero financial tables
Confirm that:
- both relationships are active
- hubspot companies[Customer Key] is on the one side
- xero contacts[Xero Contact Key] is on the one side
- the Xero contact relationship uses Both cross-filter direction
- the selected HubSpot company exists in Customer Mapping
- the Xero contact is connected to the financial table used by the visual
Power BI Cannot Create a One-to-Many Relationship
This normally means the proposed one-side column contains duplicate or blank values.
Check that:
- hubspot companies[Customer Key] contains one value per company
- xero contacts[Xero Contact Key] contains one value per contact
- blank identifiers have been removed
- Customer Key includes Connection Name as well as Company ID
- Xero Contact Key includes Connection Name as well as Contact ID
Do not change the relationship to many-to-many simply to bypass the warning. Find and correct the duplicate key instead.
HubSpot Company IDs Appear in Scientific Notation
HubSpot identifiers can be long numbers. If Power Query assigns a Decimal number data type, an ID may appear in scientific notation.
Set Company ID to Whole number before creating Customer Key. Alternatively, convert it directly to Text if the field will only be used as an identifier. Never use a rounded decimal representation to create a key.
Customer Keys Do Not Match
Both versions of a key must use exactly the same structure. Check for differences in:
- Connection Name
- data type
- spacing
- capitalisation
- separator characters
- numeric formatting
The company-level key used in this tutorial follows this structure:
Connection Name|Company ID
A contact-level key should remain distinguishable:
Connection Name|CONTACT|Contact ID
Too Many Companies Match by Name
A normalised name may not be unique. Examples include generic names such as Consulting, Services or Holdings.
Only retain names where Match Count equals 1 within the relevant connection. Send duplicated or ambiguous names to manual review rather than selecting the first result.
Email Matching Produces Incorrect Results
Shared addresses such as accounts@, finance@ or info@ may appear against multiple customers. Email addresses can also be reused when a contact changes company.
Only use an automatic email match when the normalised email is unique within the relevant candidate set. Review generic or duplicated addresses manually.
Email and Name Matching Disagree
Review the record in Conflicting Automatic Matches. The email result should generally take priority, but it must still be verified.
Once confirmed, store the decision in Manual Customer Overrides. Do not delete the conflict check merely because the current records have been resolved.
Xero Totals Are Duplicated
This can happen when:
- the mapping contains duplicate key combinations
- a Xero contact maps to multiple HubSpot companies
- raw deal and invoice rows are placed in the same visual
- an incorrect many-to-many relationship has been created
- multiple bidirectional relationship paths introduce ambiguous filtering
Keep HubSpot deals and Xero invoices in separate visuals, connected through shared dimensions and filters. Use measures for totals rather than adding raw transaction columns from both systems to the same table.
A Copied HubSpot Visual Does Not Work
Visuals copied from the Connectorly HubSpot template depend on matching table, field and measure names in the destination report.
If a visual displays an error:
- confirm that all required HubSpot tables were loaded
- recreate the relationships used by the source template
- recreate any required measures
- check whether a field has been renamed
- remove and re-add fields that Power BI cannot resolve
Power BI does not automatically copy the source report’s relationships when a visual is copied.
A New Customer Remains Unmatched
Refresh the model and inspect Unmatched Xero Contacts. The record may:
- exist in only one system
- use a different name
- have no usable email address
- share an email address with another customer
- represent an individual instead of a company
If you can verify the correct HubSpot record, add a manual override and refresh the mapping.
Frequently Asked Questions
Can You Combine Xero and HubSpot Data in Power BI?
Yes. Connectorly can make Xero and HubSpot tables available from the same PostgreSQL database. You can load the required tables into one Power BI semantic model, recreate the necessary relationships and connect customers through a controlled mapping table.
Does Connectorly Provide a Combined Xero and HubSpot Template?
Not currently. Connectorly provides separate Xero and HubSpot Power BI templates, but it does not yet provide a free template containing both complete models and their cross-system relationships. Connectorly is working on a combined template that we plan to publish in the future.
Should I Start with the Xero or HubSpot Template?
For the process described in this guide, start with the free Connectorly Xero All-In template. Load your Xero data first, then add the required HubSpot tables from the same Connectorly PostgreSQL database.
You can open the HubSpot template separately and use it as a reference for relationships, measures, formatting and report design.
Can Power BI Copy Relationships Between the Two Templates?
No. Power BI does not provide a simple way to copy model relationships from one report to another. Recreate the HubSpot relationships in the combined report using Model view or Manage relationships.
Visuals can often be copied when the destination report contains matching table, field and measure names.
How Should Xero Contacts Be Matched with HubSpot Companies?
A practical approach is to use several controlled methods:
- exact normalised company-name matching
- exact normalised email matching
- manual overrides for exceptions
Only accept unique automatic matches. Send duplicated, conflicting or ambiguous results to manual review.
What If a Xero Contact Represents an Individual?
Some Xero contacts represent people rather than companies. In these cases, compare the Xero contact with hubspot contacts[Contact Name], hubspot contacts[Email] and hubspot contacts[Contact ID].
Use a distinguishable contact-level Customer Key and do not force the person onto an unrelated HubSpot company.
Can One HubSpot Account Be Used with Multiple Xero Organisations?
Yes. A business may use one HubSpot CRM account while maintaining several legal entities in Xero. Include Connection Name in the Xero and HubSpot keys so records remain distinguishable across different Connectorly connections.
Can HubSpot Deals Be Matched Directly to Xero Invoices?
Only when both systems contain a reliable shared identifier, such as a deal ID, order number, quote number, project code or another controlled reference.
Without a shared transaction identifier, analyse HubSpot deals and Xero invoices at customer level. Do not claim that a particular deal generated a particular invoice solely because they belong to the same customer.
Why Use a Customer Mapping Table?
The Customer Mapping table stores the approved relationship between Xero contacts and HubSpot companies or contacts. It avoids an uncontrolled direct many-to-many relationship and provides a place to combine automatic matching with reviewed manual exceptions.
Will the Customer Mapping Update Automatically?
The automatic name and email matching queries run whenever the Power BI model refreshes. However, conflicts and unmatched customers still require review. Manual overrides remain necessary for business-specific exceptions.
Can This Model Include HubSpot Marketing Reporting?
Connectorly’s current HubSpot data model focuses on CRM, sales and customer-service information. It does not currently provide HubSpot marketing data. Do not build or advertise marketing reports based on fields that are not available in the current Connectorly model.
Does Combining the Data Change Anything in Xero or HubSpot?
No. The reporting process reads the available Connectorly data into Power BI. Creating Power Query transformations, relationships, measures and report visuals does not update the underlying Xero or HubSpot records.
Final Thoughts
Combining Xero and HubSpot in Power BI creates a reporting view that connects customer relationships, sales opportunities and financial outcomes.
The technical connection is only one part of the process. Reliable cross-system reporting also requires:
- consistent keys across multiple connections
- controlled customer matching
- reviewed manual exceptions
- a bridge table instead of an uncontrolled many-to-many relationship
- separate visuals for deal-level and invoice-level information
- regular validation after data refreshes
When the model is structured correctly, a HubSpot company selection can filter the corresponding Xero financial activity. This helps sales, finance and management teams examine pipeline, invoiced revenue, outstanding balances and customer value in the same report.
Connectorly currently provides separate Xero and HubSpot Power BI templates. Power BI remains the most complete Connectorly reporting experience because these templates include prebuilt data models, measures, report examples and supporting documentation.
A free combined Xero and HubSpot template is not currently available, but Connectorly is working on a template that will bring the two models together in the future. Until then, the process in this guide provides a practical and fully customisable approach.
Continue Learning
- Read The Complete Guide to Xero Reporting in Power BI
- Read The Complete Guide to HubSpot Reporting in Power BI
- Explore the Connectorly Xero and Power BI integration
- Explore the Connectorly HubSpot and Power BI integration
Bring Your Xero and HubSpot Reporting Together
If your organisation uses Connectorly for both Xero and HubSpot, the data can be made available through the same PostgreSQL reporting database. You can then use Power BI to build a combined model tailored to your reporting requirements.
Explore Connectorly for Xero and Power BI or learn more about Connectorly for HubSpot and Power BI.